Pecan Cheesecake Pie
Introduction
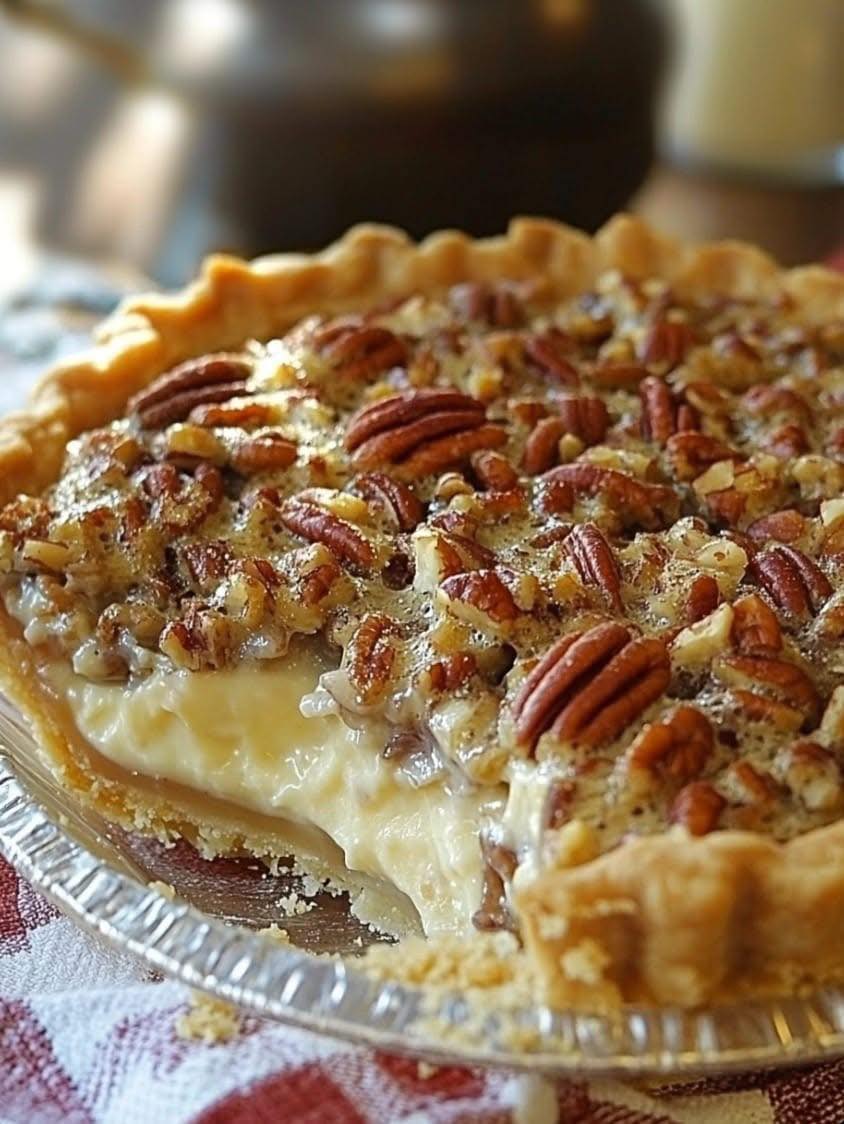
This decadent Pecan Cheesecake Pie is the ultimate mash-up of two beloved desserts—cheesecake and pecan pie. With a buttery crust, a rich and tangy cheesecake layer, and a gooey pecan topping, it delivers texture, sweetness, and crunch in every bite. It’s a dessert that looks fancy, tastes indulgent, and is surprisingly easy to make.
Origin and Cultural Significance
The traditional pecan pie hails from the Southern United States and is a staple at Thanksgiving tables. Cheesecake, with roots tracing back to ancient Greece and later New York-style adaptations, became an American favorite for its creamy texture. Combining the two brings together cultural icons into a modern dessert fusion. This pie represents Southern hospitality and American innovation—comforting, celebratory, and made for sharing.
Ingredients Quantity
Crust:
- 1 unbaked 9-inch pie crust (store-bought or homemade)
Cheesecake Layer:
- 1 package (8 oz) cream cheese, softened
- 1/2 cup granulated sugar
- 1 large egg
- 1/2 tsp vanilla extract
Pecan Pie Layer:
- 3 large eggs
- 1/2 cup light corn syrup
- 1/2 cup brown sugar, packed
- 1 tbsp melted butter
- 1 tsp vanilla extract
- 1 1/4 cups chopped pecans
Optional Additions
- A dash of bourbon for a boozy twist
- A pinch of cinnamon or nutmeg in the pecan layer
- Use toasted pecans for enhanced flavor
- Top with a dollop of whipped cream or a drizzle of caramel sauce
Tips for Success
- Make sure the cream cheese is fully softened for a smooth cheesecake layer.
- Don’t overmix the cheesecake batter—this prevents cracking.
- Keep an eye on the crust’s browning; use a pie shield if necessary.
- Let the pie cool completely, then chill it for at least 2 hours for clean slices.
- Use room temperature eggs for better consistency in both layers.
Instructions
- Preheat oven to 350°F (175°C).
- Fit the pie crust into a 9-inch pie plate and set aside.
- In a mixing bowl, beat together cream cheese, sugar, 1 egg, and vanilla until smooth. Spread evenly in the bottom of the unbaked pie crust.
- In another bowl, whisk together the remaining 3 eggs, corn syrup, brown sugar, melted butter, and vanilla until combined. Stir in the chopped pecans.
- Gently spoon the pecan mixture over the cheesecake layer—do not pour.
- Bake for 50–60 minutes, or until the center is just set and a knife inserted comes out mostly clean.
- Cool completely on a wire rack, then refrigerate for at least 2 hours before serving.
Description
This pie features a buttery crust filled with a creamy cheesecake layer that perfectly complements the rich, sticky pecan topping. The textures range from smooth and velvety to nutty and chewy. Every bite offers buttery pecans, tangy creaminess, and a satisfying crunch—all baked into a golden pie crust.
Nutritional Information (Per slice, based on 8 servings):
- Calories: 480
- Total Fat: 30g
- Saturated Fat: 10g
- Cholesterol: 95mg
- Sodium: 200mg
- Carbohydrates: 48g
- Sugars: 32g
- Protein: 6g
Conclusion
Pecan Cheesecake Pie is a showstopping dessert that brings a double dose of indulgence. It’s ideal for holidays, special occasions, or anytime you want to treat yourself and others to something truly special. Whether you’re a fan of pecan pie, cheesecake, or both—this dessert will win you over.
Recommendation
Serve this pie chilled or at room temperature with a cup of coffee, tea, or a glass of bourbon. It pairs beautifully with whipped cream or vanilla bean ice cream. For added flair, sprinkle a bit of sea salt on top before serving.
Embracing Healthful Indulgence
Desserts like this are best enjoyed in balance. To make it a bit lighter:
- Use low-fat cream cheese
- Replace some sugar with natural sweeteners like maple syrup or monk fruit
- Swap corn syrup for honey or agave
Even with these tweaks, it’s still a delight to savor. Sharing a homemade slice of something decadent connects us to tradition and each other—one forkful at a time.